Monday, November 17, 2014

Celebrating my girl!!

Hello again.
Today I thought I would share with you 2 layouts I did a couple of months ago for my DT position on the Three or More challenge blog, which is no longer running.   They are both of my daughter, Emily, simply because I am celebrating her success in being chosen as the lead in her school musical for next year.  She is beyond excited and I am so proud!

The first one is titled:  Laugh like noone is watching.  
Emily has such a great sense of humour and when I saw this chipboard title I knew exactly the photos I would use.  


The second one is from when Emily was quite young.  She loved to put her raincoat and gumboots on and play in the rain.  However, the raincoat and boots never lasted too long.


Thanks so much for stopping by. 
Until next time, happy scrapping.
Yvette x

Monday, November 10, 2014

Sun, sand & surf - summer is here!!

Good morning!
Sharing some summery layouts today that I have for A2Z Scraplets DT.

First up is a summery one of my lovely daughter at the beach.


Next is something different for me - Project Life layout.  I have only done a few PL style pages that I have interspersed with my usual scrap layouts, when I have a number of photos I want to scrap.  I find it a fast and easy way to scrap lots of photos without too much fuss.  It's not for everybody and I couldn't only do PL layouts but it's fun to throw something different into the mix occasionally.


Thanks so much for stopping by today.  Until next time, happy scrapping.
Yvette x


Monday, October 27, 2014

Perfect

Hi there!
Given the heat we've had over the weekend and still to come in the next couple of days, its only fitting that my first layout today is very summery!


Products used:
Cardstock - Bazzill
Chipboard - A2Z Scraplets
Paper - Pion Shoreline Treasures Borders
DecoArt Dimensioal Effects
Rico Design Structure Paste
Antique White Paint
Iridescent Gold Glimmermist
Flowers - Petaloo


Sand, shells & twine - stash


The second one today is of my daughter to commemorate her getting her Learners driving permit.


Products used:
Cardstock - Bazzill
Chipboard - A2Z Scraplets
Gesso
Modelling Paste
Stencils - Prima & Tim Holtz
Stamps - Prima & BoBunny
Doily
Flowers -Petaloo
Tim Holtz Idea-ology Alpha Card
Black paint
Mustard seed distress marker
Lindy's Stamp Gang & Dylusions sprays
Black archival ink
Sizzix Die
Prima Junkyard Findings Jeans Plate
Brads & yellow ribbon from stash
Gelatos


Thanks for stopping by.
Until next time, Happy scrapping!
Yvette x

Monday, October 13, 2014

A2Z Scraplets DT

Hi there!  It's Monday and the start of another new week…have a feeling it will be Christmas before I know it the way the weeks are flying by.

Today I'm sharing another 2 layouts I have done using the fabulous chippies from A2Z Scraplets.

The first one is one of my son.  He took the photo of himself back in 2009 and I only recently stumbled upon it and knew immediately that I wanted to scrap it.  The chipboards I have used are:
the wordlet "amazing" from the Beautiful amazing brush words set and
the Steampunk corner.  These corners are just perfect for boys pages.


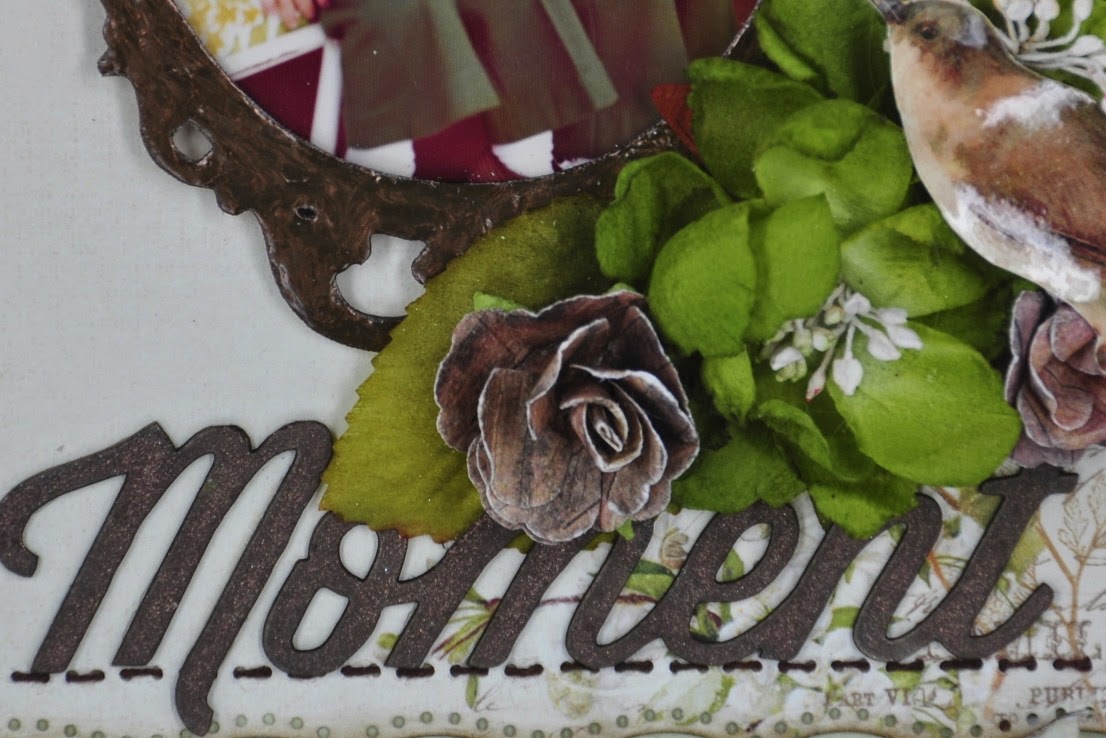
Some close ups of the chipboards:


 It's really hard to see in these photos, but I have embossed all chipboard pieces with Stampendous Shabby Blue embossing enamel, which has lots of blue glitter with flecks of gold and chunky pieces of white throughout.  It really is quite stunning to look at in real.  (just a shame it doesn't photograph well!


Products used:
Cardstock - Kaisercraft
Chipboard - A2Z Scraplets
Papermania Urban Stamp
White versa colour ink
Stampendous Shabby Blue Embossing enamel
Rubons
Metal cogs
White Dylusions spray
Lindy's Stamp Gang Tiffany Blue Spray


My second layout is one of my daughter, using "Enjoy the Journey" chipboard.   I have also used the fence, which I have actually had in my stash for quite a long time!!  Finally made use of it - hehe.


And some closeups of the chippies:

For the title I painted it with Black Soot distress paint then coated it quite generously with Crackle accents, but for some reason it didn't crackle!!  So instead it has a lovely glossy finish.


However, when I treated the fence in the same way as the title I had success!!  The fence crackled beautifully, so I then rubbed some Seedless Preserves distress paint into the cracks and gently rubbed the excess off with a baby wipe leaving the effect above.  I also rubbed the distress paint into the word banner & rubbed off the excess to highlight the words.


Products used:
Cardstock - Bazzill
Chipboard - A2Z Scraplets
Paper - Fabscraps "Fleur"
Flowers - Prima, I am Roses
Tim Holtz Idea-ology word banner
Seam binding
Distress paint - Black soot & Seedless Preserves
Bosskut leaf flourish die
Crackle accents
Kaisercraft pearl dots


Thanks for stopping by today.
Until next time, Happy scrapping,


Yvette x

Saturday, October 11, 2014

Remember...


Hi there!  The weekend is here again - yay!  Hope you're enjoying it whatever you're up to.  
I just thought I'd share some layouts I did some time ago.  One of me, in my younger years and one of my darling daughter!  Hope you like them.

First up…the layout of me.


Products used:
Cardstock - Bazzill
Paper - Pion Design Flowers Frames 6x6
Distress Ink - Walnut stain
Martha Stewart ATP punch
Fiskars punch
Chipboard - Photochips & Memory Maze
Flat back pearls
Liquid Pearls - Dark chocolate & Gold Pearl
Flowers - Petaloo & Prima
Amy Tangerine Leaves
Kaisercraft Polaroid Frame
Memory Box Kaleidescope Butterfly die
Hand died seam binding 


The next layout is of my daughter, and titled "Always follow your dreams".


Products used:
Paper - BoBunny Prairie Chic
Martha Stewart Doily tags
Kaisercraft Mini Crochet doilies
Flowers - Petaloo, Kaisercraft & Prima
Canvas fringing
Resin butterfly
BoBunny noteworthy die cuts, stickers, buttons & brads
Glass cabouchons
Walnut distress ink
Chipboard - Dusty Attic


Thanks so much for stopping by today.
Until next time,
Yvette

Friday, September 19, 2014

Kraft and Teal!


Hi!  Been a while between posts.  Today I'm sharing with you a layout I did during the week from my 40th birthday party 2 years ago.  Oops, I just gave away my age!!!!  

For a little while now I have had a desire to create with Kraft & aqua.  It is a combination I really love.
This is what I came up with….


Some closeups:


I actually couldn't get my hands on any card stock that matched the beautiful colour, so I painted some white card with clear gesso, then painted on the same colour that I spritzed the chipboard with.  Wuooolaaah!  Perfectly matching base.  I embossed the envelope in my Big Shot, then inked over the raised dots with chalk ink.  Pretty happy with how that turned out.


Products used:
Card stock - Kraft & White
Chipboard - Blue Fern & Dusty Attic
Melissa Frances Mini bags & tags
Flowers - Kaisercraft & Prima
Portacraft Rhinestone circle frames
Cheery Lynn Designs - fanciful flourish die
Prima Colour Bloom - Glistening Waves
Iridescent Medium
Lace Hessian
Butterfly

Thanks for stopping by!
Until next time, happy scrapping.
Yvette x

Thursday, September 4, 2014

My Magoo & BeYOUtiful

Hi there!  September already?!  I can't believe how fast this year is flying by…
I'd like to share with you my DT work for A2Z Scraplets today.

My first layout is titled "Magoo" which is one of many cute nicknames I had for him (and still do) when he was a little boy.

Some closeups:


The chipboard I used on this layout is called Chicken Wire Large Frame.  I generously coated the chipboard with Rico Design "Structure" paste which has a very gritty texture - I love it!  The chipboard was then drenched with black Dylusions mist.  To my surprise the result was a blue-ish colour which worked perfectly with the paper range I used.  

Products used:
Paper - Authentique Suave Collection
Chipboard - A2Z Scraplets
Rico Design "Structure" Paste
Black Dylusions Mist


The next layout I wanted to share is title "BeYOUtiful" and features my daughter.


The BeYOUtiful title was generously coated with Liquid Pearls for a wonderful metallic, pearly finish.


While the flourish was simply smothered in glimmer mist for a lovely shimmery finish.


Products used:
Paper - BoBunny Primrose Collection
Chipboard - A2Z Scraplets
Stencil - The Crafters Workshop
Viva Mother of Pearl Modelling Creme
Tattered Angels Tattered Leather Mist
Liquid Pearls
Flowers - Petaloo & Prima
Lace - purchased from LSS Bella Paperie
Kaisercraft rhinestones
ZVA Creative Pearl Flourishes
Distress Ink - Walnut Stain


Thanks so much for stopping by.
Until next time,
Yvette x

Monday, August 25, 2014

A2Z guest design spot

Hi there!  So begins another week…

I'd like to share with you 3 layouts I did for a guest design spot with A2Z Scraplets.  They have some awesome chipboard available.  You can find their chipboards by clicking here.

First up is a layout I did of me when I was only 10 weeks old.


Close up of the chipboard.  For "Baby Girl" I embossed it using Stampendous Shabby Pink Embossing Enamel.  It has such an awesome shabby effect with flecks of pink, white & gold.


And for the flourish, I simply gave it a good coat of Glimmermist.


Products used:
Cardstock: Bazzill
Paper: Blue Fern In Bloom
Chipboard: A2Z Scraplets
Lace: purchased from LSS Bella Paperie
Flowers: Petaloo & Prima
Prima Resin
Tattered Angels Glimmermist - Tattered Leather
Stampendous Shabby Pink Embossing Enamel
Martha Stewart punch


The next layout I'd like to share with you is one of my gorgeous girl as a baby with my husband.


Close up of the chipboards:  I embossed all the chipboards with Lindy's Stamp Gang Embossing powders.  They are so pretty and easy to work with.


Products used:
Paper - Blue Fern Ombre Dreams
Chipboard - A2Z Scraplets
Doily from stash
Flowers - Manor House, Petaloo & Prima
Prima Resin Angel
TWC stencil
Cheery Lyn Mini fanciful flourish
Lindy's Stamp Gang Under the Boardwalk embossing powders
Kaisercraft rubon


And finally a layout created for my son.  Something very boyish…


With the chipboard on this layout I simply embossed all pieces with black embossing powder!


Products used:
Paper - Kaisercraft Attitude! Collection
Chipboard - A2Z Scraplets
Black embossing powder
Tim Holtz gears
Prima nuts & bolts
Dylusions Black marble spray


There you have it!  Hope you enjoyed.
Until next time,
Yvette x

Saturday, August 9, 2014

Saturday night share, just because...


Hello again!
Well after a big day shopping with Miss 16 for semi formal shoes, bag & hair accessories, it's nice to have a quiet evening.  Gives me a chance to update my blog.  
Tonights share is a 'just because' page that I did last week.  I fell in love with the papers and couldn't wait to play with them!  
The photo of hubby, Miss 16 & myself was taken many moons ago - I think Miss 16 was only Miss 14 months at the time of the photo.  


I did a bit of fussy cutting on this layout….the large paper doily was fussy cut out of a larger piece of paper.  I fussy cut the corner flower flourishes in 3 of the corners of the layout and attached them with mounting tape to create depth.

The signpost chipboard was spritzed with mist and then generously coated with Crackle paint, while the wordlet, 'together' was simply left bare!


Products used:
Paper - Pion Design
Chipboard - A2Z Scraplets & ScrapFx wordlet
Flowers - Kaisercraft, I am Roses
Lace Leaves- bought from Bella Paperie
Leaf vine - from my stash
Distress Ink
Lindy's Stamp Gang spritz
Distress Crackle paint
Prima resin bird
Kaisercraft Tiny Alpha Stickers


I wish you all a wonderful weekend.
Until next time,
Yvette x

Monday, August 4, 2014

3oM DT August reveal

Hello there!
Wow, what a busy end to July and start to August I have had.  I have just commenced a new job, in a medical centre, and have been busy learning the ropes.  Top that off with a big weekend doing the tourist thing with one of my daughters friends from Germany and her family, and I haven't had any time to reveal my layout for the August 3oM challenge.  So here it is….

This month's criteria is Pockets/Envelopes.

My layout is quite a simple and fast one this month and doesn't use much more than paper!  I completed it in a little over an hour once I had decided on how to incorporate pockets on to the page, and I am very happy with how it turned out. :)


I created a pocket simply by using one of my Martha Stewart punches.  I punched a small section along the top of the green & white spotted paper, which gave me the perfect little pocket effect to put my journalling card.  I actually learnt this technique from a very good scappy friend of mine - Tina Ollett!  Thank you for the inspiration Tina xx.

Products used:
Paper - Echo Park Boys Collection Mini theme
Studio Calico wood veneer stars
Corrugated card
Martha Stewart Punch
Prima distressing tool
Brass Star (from stash)

I hope you draw some inspiration from it, just as I did from my friend.
Until next time,
Happy Scrapping,
Yvette x


Wednesday, July 30, 2014

A Perfect Moment

Hello again!  I'm back to share with you another layout featuring A2Z Scraplets chipboards.  My very dear friend Tina Ollett inspired my love of chipboard - I blame her for my addiction! LOL


Some close ups of the chipboard…


I cut the title up and spritzed the "A" and  "Moment" with glimmer mist and covered the "Perfect" with Liquid pearls.  I also covered the frame with liquid pearls.  

The frame can be found here and the title here.

Products used:
Paper - Pion: A Day in May & Grandma's School book
Chipboard - A2Z Scraplets
Martha Stewart Punch
Mist - Tattered Angels Glimmermist
Liquid Pearls 
Flowers - Prima & Petaloo
Dimensional Magic
Lindy's stamp gang embossing powder
Brown embroidery floss
Glass cabochon


Thanks for stopping by and until next time,
Yvette x

Tuesday, July 29, 2014

Could you be any cuter?

Hi all!

Just wanted to share with you another layout I have done for my guest design spot with A2Z Scraplets. This one features a photo of my gorgeous boy, taken some 13 years ago now.  Boy time surely does fly by so fast.  One minute he was a 6 month old baby, next minute he's turning 14 and still as gorgeous as ever!  (I may be biased though).


The A2Z Scraplets chipboard word can be found here.

Products used:
Cardstock - Bazzill
Paper - Echo Park Boys & BoBunny Prairie Chic
Book page
A2Z Scraplets title
Embossing Powder - Lindy's stamp gang
Prima Stitching Stamp
Sprays - Lindy's stamp gang & Heidi Swapp
 Prima Chalk Ink
Goosebumps texture spray
Dimensional Magic

Thanks so much for stopping by.
Until next time,
Yvette x

Wednesday, July 16, 2014

A2Z Scraplets guest design spot!

Hi again!

Today I am featured on the A2Z Scraplets blog with a layout I did as guest designer, as part of a prize for a challenge I entered and won.  I have created a number of layouts using products sent to me in my prize package that will be featured over the following month or so.  How exciting!!

Here is the first one up on their blog….


The A2Z Scraplets I have used are Dream like theres no tomorrow and Frame 17.
I simply embossed the frame with clear embossing powder after coating it with gesso and for the title, I first covered it with gesso then spritzed it with glimmer mist and covered it with dimensional magic for shine!

Products used:
Bazzill
A2Z scrap lets title and frame
Flowers - Manor House & Kaisercraft
Martha Stewart punch
Prima Butterfly resin
Dies - Memory Maze & Cheery Lynn
Kaisercraft Bling
Dimensional Magic
Gesso
Clear embossing powder
Stardust Stickles
Tattered Angels Glimmermist - Party Pink

Thanks for stopping by.  Be sure to stop by the A2Z Scraplets blog to check out the July challenge and maybe give it a go yourself!

Until next time,
Yvette x

Tuesday, July 1, 2014

New month, first challenge at 3OM!

Wow!!  How can it already be July??  Before we know it, we will be scrapping our Christmas photos!  Now theres a scary thought….

As it is now July, the first challenge for the 3 Or More challenge blog is now live!  As the name of the blog suggests, the challenge is to use 3 or more photos on your layout.  Each month an additional element is added to challenge you a little further.  This first month is to incorporate Frames on your page.


 Here's my layout!


I simply sprayed the raw chipboard frame with Glimmermist.  The inner frames were first painted with black paint, then spritzed with the glimmermist.  It looks much prettier when you see it - the photo doesn't do it justice.

Some close ups:


Products used:
Cardstock - Bazzill
Paper - Authentique Classique Collection
Chipboard - Dusty Attic, Memory Maze
Prima Junkyard Findings Resin
Cheery Lynn Fern Die
Flowers - Kaisercraft, Prima
Tattered Angels Iridescent Gold Glimmermist
Black paint
Dimensional Magic
Metal Butterfly charm - purchased from Bella Paperie


As usual, I have done a second layout this month.  The following layout was actually the first one I did using Frames but I wasn't sure I was absolutely happy with it….


Products used:
Cardstock - Bazzill
Chipboard - Photochips
Flowers - Kaisercraft, Green Tara, I am Roses
PortaCraft Rhinestone Numbers
Francheville Glitter Alpha Stickers
Black Sparkle Embossing Powder
Silver Embossing Powder
Stardust Stickles

I hope I have inspired you in some little way and hope you will play along with this new challenge blog!  Heres the link to Three or More

Thanks for stopping by.
Until next time,
Yvette x